Tuesday, December 21, 2010

Sugar Cookies With Royal Icing


In honor of the holiday season, I attempted to make the traditional iced sugar cookie. I noticed that sugar cookies aren't a big deal to a lot of people except for during the holidays. I don't know why, though. These cookies are DELICIOUS! I used this recipe I found on the Veggie by Season blog. It was recommended to me by this post on the Beantown Baker blog. I chose this recipe because I wanted a yummy cookie that would make a big enough batch to satisfy my sugar cookie need for all my goodie bags I'm putting together and because I wanted a cookie that would hold it's shape.

If you're intimidated by the thought of making this holiday classic, don't be. This is a recipe that anyone could make and that everyone will thoroughly enjoy.

Ingredients

  • 1 1/2 c. butter
  • 1 1/2 c. granulated sugar
  • 1/2 c. powdered sugar
  • 4 eggs
  • 1 tsp vanilla extract
  • 1/2 tsp almond extract
  • 1/2 tsp lemon extract
  • 5 c. flour
  • 2 tsp baking powder
  • 1 tsp salt
  • Powdered sugar, for rolling

1. Preheat your oven to 400 degrees.

2. Cream butter and sugar together for 5 minutes using a hand mixer or stand mixer. It's important to cream the two ingredients for a full 5 minutes, don't rush or you'll be sorry!

3. Add eggs one at a time. Make sure each egg is completely incorporated before adding the next.

4. Add all three extracts and mix in thoroughly.

5. Sift and mix in the flour, baking powder, and salt a little at a time. I did about a cup at a time. Be sure you don't over mix the flour. If too much gluten develops you'll end up with hockey pucks instead of cookies.

6. Roll out a portion of the dough on a counter that's been WELL DUSTED with powdered sugar. Don't be afraid of the dusting sugar, if you have too little the dough will stick to the counter and you'll have a complete mess. Make sure you sprinkle a little powdered sugar on top of the dough and on the rolling pin as well to avoid sticking. I divided the dough into 4 portions and rolled them out one a time to cut out my cookies. If you have the counter space to roll out more dough, then by all means please do!

One thing I did wrong with the first batch of cookies was I rolled the dough out too thin. This resulted in thin, flat, burnt cookies. You want to roll the dough out to about the thickness of half of a checkbook. Just eyeball it and make sure there's a little depth your cookies.

7. Bake cookies for 6 to 7 minutes, or until the edges are just barely starting to brown.


For the icing, I used this recipe from Allrecipes.com. I chose this recipe because it made small enough batches I could easily whip up individually for each of the colors of thick icing and flooding icing. What I didn't realize before I iced these cookies was that using royal icing takes a bit of patience. Please be sure to give your cookies plenty of time to sit out so that the icing can harden.

Ingredients
  • 1 cup confectioners' sugar

  • 2 teaspoons milk

  • 2 teaspoons light corn syrup

  • 1/4 teaspoon almond extract -- or whatever you want to use. I substituted lemon and vanilla extract in some of my batches.

  • assorted food coloring


  • In a small bowl, mix confectioners' sugar, corn syrup, and milk until smooth and glossy. If the icing is too thick (like mine was) add a teaspoon of milk and corn syrup until just right.

    There are two types of icings that you'll use when icing sugar cookies, a 'thick' icing that you'll use for outlining the cookies and then a thinner 'flooding' icing you'll use to fill in outlines.

    To make the 'thick' icing, stick to the recipe above. To make the 'flooding' icing, add two more teaspoons of milk.


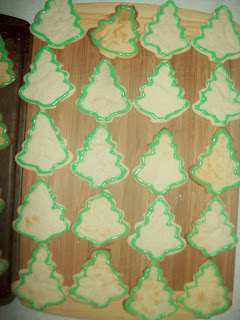
    Here's a picture of my reject cookies that I practiced on before doing the real thing.

    Be sure you allow the cookies to cool completely before you start outlining them with the thick icing.


     Once you've outlined your cookies, make sure you let them sit for at least an hour and a half so the frosting has time to set up.

    Once the outlining frosting has set up you can add the flooding frosting and use a toothpick to spread it around and fill in the outline. You'll want to allow the flooding icing to sit out overnight (so it can harden)  before adding any embellishments to your cookies.

    I used ketchup bottles to squeeze out the icing, but I know other bakers who use the #2 Wilton tip and a piping bag. Use whatever you want to use, it won't affect the outcome.

    Alas, here are the final products:


    This recipe yielded five and half dozen delectable cookies.

    Enjoy and Merry Christmas!

    Thursday, December 16, 2010

    Pinwheel Cookies


    I've been a busy, busy baker! The Christmas baking marathon has officially started in my house. Since I've ran out of eggs, I'm taking the day off to blog.


    I originally saw this recipe on Annie's Eats blog and knew immediately that I needed to make it. I went into it knowing it was going to be a bit of a challenge since I've never done anything like this before. But I had no idea just how hard it would be! From the dough being too crumbly to stay together to burning the better half of the batch of dough, you name a baking conundrum and it probably happened. I'm going to make another attempt to make these since I think I've figured out what I did wrong.


    Despite the obstacles I encountered, these cookies turned out DELICIOUS! Do you remember those yummy little cookies that come in tins usually around this time of year? These are those kind of cookies, only a million times better! They're absolutely mouthwatering, I believe you'll thoroughly enjoy these little delights.


    I made 2 batches of dough, one plain and another chocolate, so I could roll them together to make the pinwheels. Here's the list of ingredients for ONE batch of dough. Don't skimp on the butter, not only will your dough completely fall apart but the flavor of the cookie won't be completely developed. I know it's a lot but trust me, you won't be sorry.


    Ingredients


    1 large egg
    12 tbsp. unsalted butter, softened
    1/3 cup plus 1 tbsp. sugar
    ¼ tsp. salt
    1 tsp. vanilla extract
    1½ cups unbleached all-purpose flour


    1. Place the egg in a small saucepan and cover with water. Bring water to a boil. Once the water is boiling, remove the saucepan from the heat, cover and let sit for 10 minutes. Meanwhile fill up a small bowl (I used my measuring cup) with ice water.

    2. After the egg has sat for 10 minutes, transfer the egg into the ice water and let sit for 5 minutes.

    3. Once egg has sat in ice water for 5 minutes, carefully crack the egg and peel away the shell. Separate the yolk from the white and discard the white.


    4. Press the yolk through a fine mesh strainer. My yolk was bright yellow like a raw yolk is but was a thicker consistency than a raw yolk, it wasn't runny at all. It's not supposed to be pale yellow like a hard boiled egg. I tried to get a good picture of the yolk so you have an idea of it's consistency. Here's my best attempt:


    5. In the bowl with the egg yolk, combine butter, sugar, and salt with an electric beater. Beat on medium speed until light and fluffy (about 3 minutes).

    6. Once butter mixture is light and fluffy, turn the mixer down to low and beat in vanilla until well incorporated.


    7. Add the flour and mix on low speed until everything's combined. Then use your hands to press the dough into a ball. If the dough is crumbling apart, add more butter 1 tbsp at a time until it's no longer crumbly.

    8. Divide the dough ball in half and set aside.

    9. Repeat steps 1 thru 8 but instead only using 1 1/3 cups of flour and 1/4 cup of cocoa powder to make the chocolate dough.

    10. Once you have the plain and chocolate doughs separated, roll out each dough half on lightly floured wax paper until it forms a rectangle that's about 1/4 inch thick.


    11. Place one rectangle of chocolate dough on top of one rectangle of plain dough and roll dough starting with the long end into a tight log. Use the wax paper to help you roll the dough. I tried using my hands and the dough was sticking to the paper when I tried pulling it off. When I used the wax paper to roll and then pull the paper off the dough, it came up just fine. Twist ends of wax paper and chill for 1 hour. Repeat with the remaining halfs of dough.

    12. Once dough has chilled for an hour, preheat your oven to 350 degrees. Slice your dough logs into 1/4 inch thick rounds. Be sure to rotate your log after every few slices so the log doesn't become misshaped.


    13. Place the cookie rounds an inch apart on a baking sheet lined with parchment paper or aluminum foil. Bake cookies for 15 minutes, rotating the cookie sheet halfway through. Allow cookies to cool.


    Like I said before, these cookies were difficult for me to make but were absolutely delicious. Here's a few mistakes I made that I want to share with you so you don't make them as well.

    • I rolled and chilled the plain dough and chocolate dough into loges without stacking them first. I thought that I would be able to roll the dough out once it had chilled, and I was wrong. I had to let the dough soften up and go repeat steps 10 & 11.
    • I put the dough in the freezer and I think I should've put it in the refrigerator. The dough fell apart when I was slicing it and I think it was because the dough was too hard. Next time I make this recipe I'm going to put it in the fridge and make sure it's slightly soft when I slice it.
    • Lastly, my ADD got the best of me and I forgot about a batch I had in the oven when I was organizing my pantry. I'll be investing in a kitchen timer this weekend.
    • I also forgot to rotate the cookie sheet halfway through (thanks again, ADD)


    Enjoy! Let me know how your attempt goes!

    Saturday, December 11, 2010

    Learning Moments: The Perfect Pie Crust

    For this weeks Learning Moments, I went in search of the perfect pie crust. Since we're in the midst of the holiday baking season, I figured this would be a helpful topic of discussion.

    Pie crust is essentially a mixture of flour, water, and fat. Seems pretty simple, right? Well where the science (and it is, in fact, a science) of the pie crust comes in is the culmination of the ingredients. Let's not jump ahead of ourselves, though. We should have an understanding of the purpose for each of the three main ingredients and how they interact with each other.

    Let's start with flour. Flour is the main ingredient in a pie crust recipe and serves as the body of the dough. It provides a foundation for the other ingredients to stand upon. Generally all purpose flour is utilized in a pie crust recipe. All purpose flour is chosen instead of cake or even pastry flour because of the gluten content it provides. Gluten provides structure when mixed with liquid. Having too much gluten can cause a crust to be tough while having too little gluten will produce a pie crust that falls apart.

    When water is added to flour, it helps develop the gluten and makes steam that will give you a flaky crust. the amount of water you use when making a pie crust is crucial; too much water and you have something resembling a clay disc while too little water will give you crumbs rather than dough. It's important that you use ICE COLD water when making a pie crust dough so that the fat doesn't soften.

    Finally, fat. It serves as a flavoring agent and works together with the water to make a flaky crust. In my research, I found recipes that called for lard, shortening, or butter. Lard and shortening will definitely help you  make a flaky crust, but it doesn't serve much purpose in the flavor department. Butter, however, will provide a nice flavor and give that desired flaky texture. As I mentioned earlier, it's important that your fat doesn't soften. This is because if the fat is completely incorporated into the flour and water, you'll have dough that will fall apart on you. If the fat is cold, it will mix into the batter in chunks and provide a flaky yet stable dough.

    So in summary:

    1.Flour: Use all purpose.
    2. Water: Keep it ice cold.
    3. Fat: Butter is best.

    In true scientific research style, I have three versions that I've manipulated to be slightly different from each other and am measuring their ability to produce a stable flaky crust.

    My three variations are as follows:

    1. Plain Martha Stewart Pate Brisee recipe
    2. Pate Brisee recipe + liquor

    3. Pate Brisee recipe + grated butter

    Let's start with a list of ingredients:
    • 2 1/2 cups all purpose flour
    • 1 teaspoon salt
    • 1 teaspoon sugar
    • 1 cup (2 sticks) unsalted butter, chilled
    • 1/4 to 1/2 cup ice water
    I sifted together the flour, salt, and sugar and then put the bowl into the freezer with the butter. After about 30 minutes I removed the flour mixture and the butter and divided each into thirds.

    Variation 1: Plain Martha Stewart Pate Brisee

    1. I took the first third of my butter and cut it into small pieces.

    2. I then added the butter to my flour and mixed the ingredients by hand. Use your thumbs to mash the butter into the flour.

    3. Once the butter and flour were starting to form marble sized pieces I added 1/4 cup of ice water and used a hand mixer on low speed for 3 seconds to blend the ingredients. Make sure to not over blend. You can use a spoon if you think you may go crazy with the beater.

    4. Once everything was barely mixed together (you should still see chunks of butter) I balled up the dough, flattened the ball into a disc, wrapped the disc in plastic wrap, and refrigerated for about and hour and a half. 

    Observations: This dough was sturdy when I balled it up. It came together and stayed together nicely.


    Variation 2: Pate Brisee recipe + liquor

    1. I took the second third of my butter and cut it into small pieces.

    2. I then added the butter to my flour and mixed the ingredients by hand. Remember, it's all in the thumbs.

    3. Once the butter and flour were starting to form marble sized pieces I added a little less than 1/8 cup of vodka that's been sitting in the freezer (remember the importance of cold ingredients?) and 1/8 cup of ice water and then used a hand mixer on low speed for 3 seconds to blend the ingredients. Make sure to not over blend. You can use a spoon if you think you may go crazy with the beater.

    4. Once everything was barely mixed together (you should still see chunks of butter) I balled up the dough, flattened the ball into a disc, wrapped the disc in plastic wrap, and refrigerated for about and hour and a half.

    Observations: This dough was the stickiest out of all three. This dough also seemed like the most likely to break. It rolled out the thinnest.


    Variation 3: Pate Brisee recipe + shredded butter

    1. I took the last third of my butter and shredded it with a standard vegetable grater. I have to say, I was very skeptical that the grater would actually grate the butter. I thought I was going to end up with a big buttery mess but because the butter was COLD, it shredded just fine!

    2. I then added the butter to my flour and mixed the ingredients by hand.

    3. Once the butter and flour were starting to form marble sized pieces I added 1/4 cup of ice water and used a hand mixer on low speed for 3 seconds to blend the ingredients. Make sure to not over blend. You can use a spoon if you think you may go crazy with the beater.

    4. Once everything was barely mixed together I balled up the dough, flattened the ball into a disc, wrapped the disc in plastic wrap, and refrigerated for about and hour and a half.

    Observations: This dough was the crumbliest out of all the doughs. It didn't hold up as well as when balled up as the others.


    Once all three doughs had a chance to chill in the refrigerator for an hour and a half:
    • I rolled each dough out on a floured counter 
    • I then cut two circles out of each dough and placed them into a greased cupcake tin.
    • To be able to differentiate each kind of dough, I poked holes in the bottom of each making the letters 'M' for the plain Martha Stewart recipe, 'P' for the liquored recipe, and 'S' for the shredded butter recipe.
    • I baked the doughs in an oven preheated to 350 degrees for about 13 minutes.

    Final Observations:


    The first variation (plain Martha Stewart Pate Brisee) baked darkest in color, the second variation (Pate Brisee + liquor) baked the thinnest, and the third (Pate Brisee + shredded butter) baked the lighest in color.

    I enlisted the assistance of my favorite tastetester, my husband Armando, to conquor the task of tasting each of the three crusts. We both agreed that the first variation was very flaky. The second variation was kind of hard to bite into. Finally, the third variation was very consistent and tasted the best.

    We concluded that the third pie crust was the best because it was flaky, but didn't crumble all over, and tasted great.

    So, if you want a flaky pie crust that also tastes great, use shredded butter, all purpose flour, and cold ingredients. Below is the winning recipe.


    The Perfect Pie Crust


    • 2 1/2 cups all purpose flour
    • 1 teaspoon salt
    • 1 teaspoon sugar
    • 1 cup (2 sticks) unsalted butter, chilled
    • 1/4 to 1/2 cup ice water


    1. Sift together flour, salt, and sugar.

    2. Place bowl with flour mixture and butter in the freezer. Remove after 30 minutes.

    3. Shred butter and mix into flour mixture with spoon or hands.


    4. Gradually mix in ice water until dough starts to form marble sized balls. Dough should not be sticky.

    5. Divide the dough into 2 halfs, wrap in plastic, and refridgerate for at least an hour and a half.

     Dough can be frozen up to a month.

    **Make sure to place all ingredients in the freezer for at least 30 minutes and use ice water.**

    When I embarked on my search of the perfect pie crust, I enlisted the help of some of the finest bakers I know, the ladies from the 'What's Cooking' message board on TheNest.com. A special thanks to duchessII81, bmk112302, martinilove, GardenPeach, maxlad, and blu-eyedwife for your suggestions.


    I hope you enjoyed this comprehensive review of pie crusts. Please let me know what you thought. I'm going to go eat some pie!

    Thursday, December 9, 2010

    Buttery French Toast


    This recipe was inspired by miss Paula Deen. With that being said, you should know going into it that this is not a figure-friendly recipe. It is, however, oh so yummy. This is not your ordinary French Toast recipe, this is jazzed up by using a croissant  instead of plain white sandwich bread I grew up with.


    Ingredients:
    • 1 Croissant
    • 1 Egg
    • 1 tsp Cinnamon
    • 2 tbsp Butter
    • 1 tsp Vanilla Extract
    • 2 tbsp Water (you can also use milk if you'd like)


    1. Melt butter in a pan on medium heat.

    2. While butter is melting beat egg, cinnamon, vanilla and water in a bowl. 


     3. Slice the croissant in half so that it makes 2 slices. Using a knife with a serrated edge is easiest.


    4. Dip each half into the cinnamon mixture.


    5. Fry the croissant halves in the melted butter for 2-3 minutes per side. You'll know it's done when each side has a thin crust.


    6. Garnish with some powdered sugar and syrup (you can even add some nuts if you'd like) and enjoy!


    My favorite part of making this dish was the aroma of the cinnamon and butter together when the croissant was frying. Using a croissant instead of plain sandwich bread really adds a special touch to the dish. When you bite into this French Toast, you get hit with the savory flavor of the butter, the sweetness of the powdered sugar and syrup, and the richness of the croissant all at once. I thoroughly enjoyed this dish!

     This recipe yields 1 mouthwatering serving.

    In true Paula Deen fashion I'll leave you with this,

    Enjoy Y'all!


    Tuesday, December 7, 2010

    Cinnamon Chip Oatmeal Peanut Butter Cookies


    This is a recipe that has 3 of my favorite things:
    1. Cinnamon
    2. Oatmeal
    3. Peanut Butter
    These delightful cookies are a cinch to make and should please even the pickiest of pallets.


    Ingredients:


  • 3/4 cup butter

  • 1/2 cup white sugar

  • 1 cup packed brown sugar

  • 2 eggs

  • 1/3 cup peanut butter

  • 1/4 cup water

  • 1 teaspoon vanilla extract

  • 1 1/2 cups all-purpose flour

  • 1/2 teaspoon baking powder

  • 2 cups rolled oats

  • 1 cup cinnamon chips


  • 1. Preheat your oven to 350 degrees.

    2. Beat butter and both sugars until creamy.


    3. Beat in eggs one at a time. 


    4. Stir in peanut butter, water, and vanilla.


     5. In a separate bowl, mix flour and baking powder together then beat into peanut butter mixture until well combined.


    6.   Mix in rolled oats and cinnamon chips.


    7. Then spoon mixture (about 2 teaspoons each) onto a greased cookie sheet and bake for 7 minutes.


    8. If you can resist (I wasn't able to) allow the cookies to cool on a cooling rack. Enjoy!


    This recipe yielded about 5 dozen cookies for me. They are decadent and super yummy. These cookies will go great with my evening cup of coffee.

    Number of baking injuries: 1 (I'll spare you the picture)

    Husband Rating: 4/5

    Monday, December 6, 2010

    The Spontaneous Baker's Christmas Wishlist

    Tis the season for gift giving and receiving. Since I've taken care of the giving portion, I thought I'd compile a list of things I would like to receive, in case my husband Santa is reading this blog. These are things I've heard rave reviews for but have yet to be able to try out personally.

    The first on my Christmas wishlist is this Retro Apron from Wrapables.com. There's something about these old-school aprons that makes me want to bake in a skirt and high heels. Realistically, that's never going to happen. But the essence of this apron gives me the inspiration to make homemade from scratch goodies like apple pies or chocolate chip cookies (you know, Americana stuff). I believe I would also feel more stylish doting this around the house because let's be honest, the stay at home mom wardrobe that consists of yoga pants and a college t-shirt (for me at least) can be pretty mundane. 
    The next item on my Christmas wishlist are these Chef' n Vipe Salt & Pepper Balls.  How much more ergonomic can you get? I mean all you have to do is grab the handles, squeeze, then set back on the counter. These look very convenient and stylish. This salt and pepper grinder pair would give more 'spice' to seasoning your meals (Get it? Get it? More 'spice' to your meals??). I would probably have way too much fun with these gadgets.


     My next wishlist item are these OXO Pop Containers. These containers appeal to me because they provide a airtight seal, are stackable, and made of a very durable BPA free plastic. I would use these to store my all purpose flour, cake flour, granulated sugar, powdered sugar, brown sugar, chocolate chips, and any other baking ingredient that needs storage. I like that these containers are clear which would provide easy identification.
    My first thought when I saw these Wilton Stackable Cooling Racks was "G.E.N.I.U.S" . I mean seriously, what is a baker supposed to do with 3 dozen cookies fresh out of the oven and limited counter space? These stackable cooling racks would meet the need of allowing my warm goodies an opportunity to cool with out spilling over onto my kitchen table.


     I don't know about you, but my artistic genius has trouble expressing itself. I love the thought of beautiful, artistic, articulate cake decorations but when it comes time for the proverbial rubber to meet the road, the end result is little less than eye-catching. This Cricut Cake Personal Electronic Cutter is a device where you simply push a button to select your design and whala! Out comes a perfectly cut piece of gum paste or frosting. This could make anyone look like and everyday Martha Stewart. Imagine going to your get together and dropping off a tray of cup cakes with perfectly cut stars. People will think you spent hours making sure each star was perfectly symmetrical. This could make even the least artistically inclined baker could pull off beautiful pastry decorations.
    The next item on my Christmas wishlist is  Knape & Vogt® Full Round Cabinet Lazy Susan. All my spices get pushed to the back of the cabinet as time goes on thus making the retrieval of a spice not used recently quite a process. I would use 2 tiered lazy susan to separate cooking and baking spices and provide an efficient way to find spices without tearing apart my cupboard. I imagine that this would be useful to organize pots and pans in addition the the spices. How epic would it be to be able to open up a cupboard door and 1. not have anything fall out and 2. to locate the desired spice within seconds? Pretty nifty in my book.


     Last but certainly not least is the KitchenAid KV25G0X Stand Mixer. It seems like everyone who's anyone in the baking world has one of these beautiful stand mixers. I understand why, though, as it appears to be magic. With this machine, you can blend, whisk, and knead. You can also make fresh pasta with an additional attachment. My preference, being the traditionalist that I am, would be the classic KitchenAid Red. I love that this model has the wrap around bowl holder and bowl lift. It also has a 450w motor, can you say pooowwwwweeerr? "I will have this machine one day" I said to myself as I read all the fabulous details and reviews for this model.

    This concludes my Christmas wishlist. I hope you found this insightful and entertaining. If you have any first hand experience with any of the above products, feel free to leave a comment and tell me about it!

    Sunday, December 5, 2010

    Cheesy Garlic Biscuits


    I found this recipe on this blog when I was searching for some new ideas for Thanksgiving dinner. My mother in law from Peru was going to be with us during the holiday so I wanted to give her the best experience possible.

    What first attracted me to this recipe was the title. It was simple yet intriguing. Then I read the ingredients and I had to do a double take to make sure I wasn't missing anything. There was 6 ingredients total and it didn't take hours to rise and bake and all that other nonsense that bread can require.

    Here's my adaptation:

    1 1/2 cups of Pioneer Baking Mix
    1 1/2 cups of shredded cheese (I used a Mexican blend since that's what I had already)
    1/2 cup of Milk
    2 tbsp of Butter
    1 tbsp of Oregano
    3/4 tsp of Garlic Powder

    1. Preheat oven to 400 degrees

    2. Mix baking mix, milk, cheese and garlic powder until it forms a sticky dough.

    3. Place lumps of dough onto a greased cookie sheet. I made 9-12 big biscuits with this recipe.

    4. Bake for approximately 10 minutes until the top is starting to brown.

    5. Melt the butter and then mix in oregano.

    6. Brush butter over biscuits and allow to rest for about 5 minutes, if you're able to resist that long.

    This recipe is E.A.S.Y. I think it took me all of 2 minutes to incorporate all the ingredients and get the biscuits in the oven. In addition to being super easy, these biscuits are supper yummy! My mother in law asked immediately how I made these, which is a good sign in my book. I made this recipe the 2 nights following Thanksgiving at the request of my husband and mother in law.

    Husband rating: 5/5.

    Review: Mr Coffee Coffee Grinder (Black)


    I bought this coffee grinder to make my son fresh rice cereal and to have fresh ground coffee in the morning. As a new mother, coffee has become an essential part of a successful day.

    I tried it out for the first time this morning. I used 2 1/2 coffee scoops of coffee and ground for 15 seconds per the instruction pamphlet's directions. It wasn't as loud as I was expecting it to be, which I was pleasantly surprised for. I was also skeptical at first that it would grind so much coffee in so little time and be the accurate grind for my coffee maker but yet again I was pleasantly surprised at how fine the grind (not too fine though).

    Once I put the ground coffee into my coffee maker and hit brew, I was giddy with excitement to try my first cup of home made freshly ground coffee. Once I heard those magical beeps from my coffee maker indicating the pot was ready I got my 2 Splenda's, International Delight coffee creamer, and my favorite coffee cup and divulged into an aromatic cup of coffee.

    This cup of coffee was absolutely heavenly. The flavor was so fresh and the aroma permeated the kitchen. If you're considering switching from pre-ground coffee to freshly ground, do it. Don't even think about it, just do it. I would recommend this coffee ginder as I was very pleased with it's performance and the outcome. Two thumbs up!

    Hi!

    Hello and welcome to The Spontaneous Baker! The name of the blog says it all. I love to bake, however when the urge to bake something strikes, it's usually very spontaneously. I have no formal training whatsoever, I love to teach myself. I'm a mother to my wonderful son, Kevin, and a wife to my adoring husband, Armando.

    Enjoy my recipes, reviews, and rants. Feel free to unload unsoclicited advice, praise, or whatever else you feel the need to say.